Does anybody else have an incessantly squeaky bed?
Me! Me! *waves hand frantically*
That is until I found a way around it. Yes, you don't have to ask, I found this idea on pinterest. Haha!
It was mainly my headboard that gave me the most trouble. My bed frame was old and passed down. Some of the screws were missing from different places and it'd rattle. I found this picture on pinterest a couple months ago and was inspired. A headboard made out of barn wood? How cool!
I was going to do a step-by-step process on how to make this, but after seeing how difficult it was... Well, I take that back, it's not so much as difficult as it requires a lot of man power. My daddy and brother, Zach, are super guys, let me tell you.
But I will give you a brief description of how we went about creating my new headboard... First I had to find some barn wood. My grandparents happened to have some laying around their farm, so I was able to get mine for free. Which was outstanding! After we cut it the right length, we went out and bought a big piece of plywood. I went ahead and painted my plywood black, just in case some of it happened to show through the cracks. After that, we nailed each piece of barn wood onto the plywood individually, in order to make one big board. It worked out really nicely, but also ended up weighing a ton. Hence, the man power. My dad then nailed two two-by-fours onto the plywood to make legs for support. He nailed these into my wall, pushed my bed up against it (after my old headboard was removed), and twa-da, I have a new headboard!
Here's the finished product:
I have to admit, the first night it was done, I didn't sleep so well. I was so afraid it would some how come out of the wall and squish me. Zachary made the joke that I'd then be "Flat Katie"...like "Flat Stanley". Lovely brothers... ;)
But, the nails have done their duty and held fast. I'm now sleeping peacefully without a rickety headboard.
Showing posts with label Crafts. Show all posts
Wednesday, August 29, 2012
Sunday, July 8, 2012
Scrappy-Journal
This is a book that I like to affectionately refer to as my scrappy-journal. (Scrapbook + Journal = Scrappy-Journal) All it is really is an ordinary composition notebook. At least it was when I bought it. Clearance at Walmart...can't beat that! When I got it, I made a pact with myself that I wasn't going to be a perfectionist. I was going to cut and tape and scribble...even be messy if I felt like it. And that's what I've done. As you can see, it's bulging with creativity. And it's incredibly easy, so I thought I'd show you how to do it.
(Oh, before I go any further, I know the quality of some of these photos isn't the best. They were hurriedly snapped in my darkish room. My apologies.)
(Oh, very random side note...I just happen to be grooving to the Tarzan soundtrack right now. ;) )
Okay, back to my journal. I thought I would do a very brave thing and let you see inside. On one condition. No making fun, okay? Sound good?
My first couple pages are book lists. I love to look back and see old titles I've read and remember the stories. Plus it helps me keep up with how many books I've read in a month/year.
I like to write funny quotes that I find on pinterest...things that just plain describe me. And I also tape or stick things that I find places. Like the stickers below.
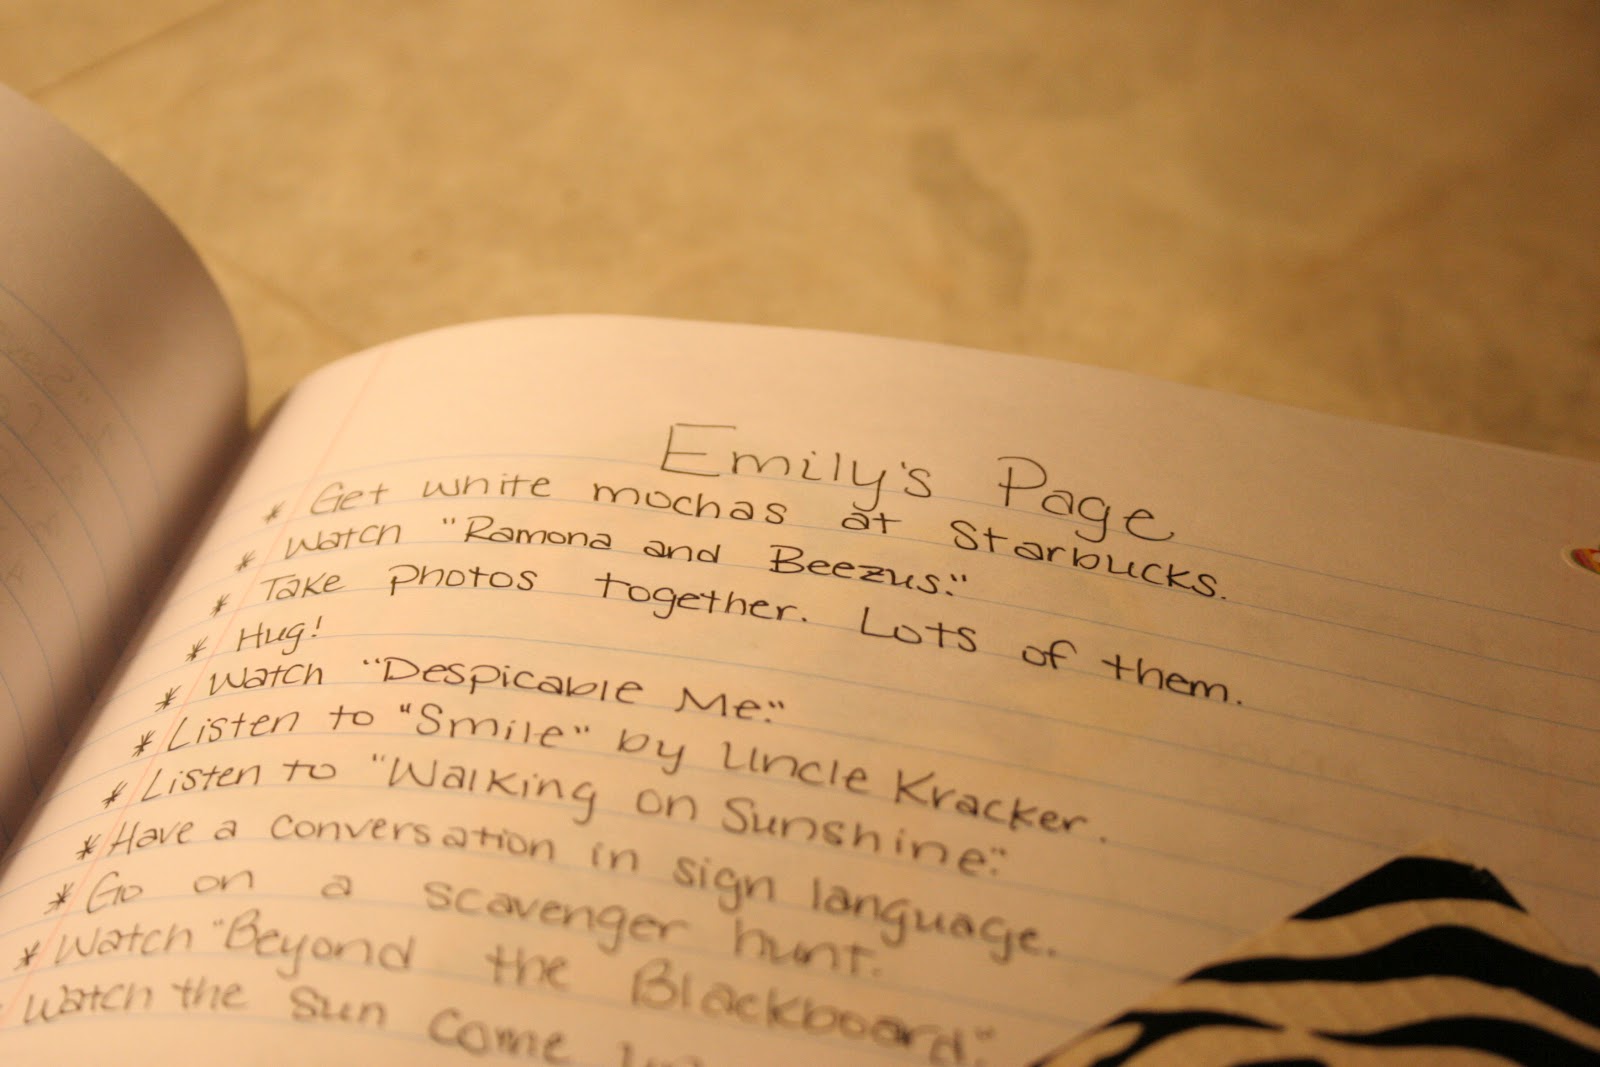
One of my most treasured pages is the one below. I made it for one of the dearest people I know. Emily is my pen pal and best friend. We met over blogger a year and a half ago, and someday we'll meet in person. I just feel it in my bones. So I made a page with things we want to do when we meet.
After a couple months of taping and sticking, my journal started to get...well a bit fat. I didn't want anything falling out, so I grabbed a heavy duty hole punch from my mom's office and punched a hole in each side. With a couple pieces of ribbon I'm able to tie it up. It works very nicely.
Not only do I like to put funny things in my book, but also little pieces of inspiration. Quotes, song lyrics...things I find on pinterest or other blogs. Things I simply want to remember.
The page below happens to be my most recent. "All the time God is writing a bigger narrative."
I also have a summer bucket list, old movie tickets, my birthday and graduation invitations. I used a few pages for people to sign at my graduation ceremony. I have my first "I Voted" sticker in there. A seashell I got in Florida last year. And an origami frog that I made. Random...and yet special things to me.
(Oh, before I go any further, I know the quality of some of these photos isn't the best. They were hurriedly snapped in my darkish room. My apologies.)
(Oh, very random side note...I just happen to be grooving to the Tarzan soundtrack right now. ;) )
Okay, back to my journal. I thought I would do a very brave thing and let you see inside. On one condition. No making fun, okay? Sound good?
My first couple pages are book lists. I love to look back and see old titles I've read and remember the stories. Plus it helps me keep up with how many books I've read in a month/year.
I like to write funny quotes that I find on pinterest...things that just plain describe me. And I also tape or stick things that I find places. Like the stickers below.
One of my most treasured pages is the one below. I made it for one of the dearest people I know. Emily is my pen pal and best friend. We met over blogger a year and a half ago, and someday we'll meet in person. I just feel it in my bones. So I made a page with things we want to do when we meet.
After a couple months of taping and sticking, my journal started to get...well a bit fat. I didn't want anything falling out, so I grabbed a heavy duty hole punch from my mom's office and punched a hole in each side. With a couple pieces of ribbon I'm able to tie it up. It works very nicely.
Not only do I like to put funny things in my book, but also little pieces of inspiration. Quotes, song lyrics...things I find on pinterest or other blogs. Things I simply want to remember.
The page below happens to be my most recent. "All the time God is writing a bigger narrative."
I also have a summer bucket list, old movie tickets, my birthday and graduation invitations. I used a few pages for people to sign at my graduation ceremony. I have my first "I Voted" sticker in there. A seashell I got in Florida last year. And an origami frog that I made. Random...and yet special things to me.
Friday, June 22, 2012
jane austen mug
Pinterest strikes again, folks. I saw another idea on there not too long ago and thought I'd try it out for myself.
Supplies
Plain white mug: $1.00 at Goodwill
I already had a black sharpie.
And an oven.
Here's what you do. Take your mug and carefully write/draw/scribble on it with your sharpie. Pre-heat your oven to 350 degrees. When it is heated, put your newly designed mug on a baking tray and "cook" for 30 minutes. Then your design won't come off (unless you put it in the dishwasher).
{Note: Don't worry if you mess up! If you haven't put your mug in the oven yet it's fairly easy to wash off the sharpie and start over.}
When the 30 minutes is up, carefully remove the tray and let your mug cool before washing or drinking out of it.
Once the mug is cool, you have a brand new member to your cupboard.
*grins* I couldn't help it. I had to go for the Jane Austen quote.
Supplies
Plain white mug: $1.00 at Goodwill
I already had a black sharpie.
And an oven.
Here's what you do. Take your mug and carefully write/draw/scribble on it with your sharpie. Pre-heat your oven to 350 degrees. When it is heated, put your newly designed mug on a baking tray and "cook" for 30 minutes. Then your design won't come off (unless you put it in the dishwasher).
{Note: Don't worry if you mess up! If you haven't put your mug in the oven yet it's fairly easy to wash off the sharpie and start over.}
When the 30 minutes is up, carefully remove the tray and let your mug cool before washing or drinking out of it.
Once the mug is cool, you have a brand new member to your cupboard.
*grins* I couldn't help it. I had to go for the Jane Austen quote.
Tuesday, March 20, 2012
Book Page Flowers
Pinterest is a lovely thing isn't it? That's where I originally saw these flowers and was able to find the tutorial through the photo. If you'd like to check it out just go right over HERE.
I have to say, I'm a bit of a crafty person. And I had a blast making these. I hope you will too!
Okay, here we go. To start off, here's what you need:
Then roll up one of your cut pages. It needs to be pretty tight. And it's easier if you pinch the bottom as you go. When you finish, use tape to secure it.
Sticking a pencil through the middle will help you open it up.
Now, do the same thing with another book page except roll it looser. Make sure the hole is big enough to fit your first rolled page inside. You can do a third layer if you'd like to make your flower more full.
Then press the middle and spread out your petals.
I think the button really finished it off.
Now, I must confess here...the original tutorial said to use a hot glue gun. Well, I don't have one. So I improvised...with *cough cough* duct tape. But it seems to be doing just fine. That's some handy stuff there, I tell ya.
I have yet to find a vase for my little flowers, so they're sitting on my bookshelf at present. I'm hoping I'll find a real nifty one at a yard sale or something.
Enjoy! Let me know if you have any questions or if you decide to try it out.
I have to say, I'm a bit of a crafty person. And I had a blast making these. I hope you will too!
Okay, here we go. To start off, here's what you need:
- An old, unused book you don't mind cutting up. (I know...I got that sinking feeling in my stomach too. Cutting up a book?! You've gotta be kidding me. It's okay, you're not the only one.)
- Scissors.
- Tape.
- Buttons.
First, you'll need to cut a couple of the book pages in half (maybe a little less than half depending on the size of your book) and cut strips in them (leave room at the end for your stem). Make sure you have words on both sides.
Then roll up one of your cut pages. It needs to be pretty tight. And it's easier if you pinch the bottom as you go. When you finish, use tape to secure it.
Sticking a pencil through the middle will help you open it up.
Now, do the same thing with another book page except roll it looser. Make sure the hole is big enough to fit your first rolled page inside. You can do a third layer if you'd like to make your flower more full.
Then press the middle and spread out your petals.
I think the button really finished it off.
Now, I must confess here...the original tutorial said to use a hot glue gun. Well, I don't have one. So I improvised...with *cough cough* duct tape. But it seems to be doing just fine. That's some handy stuff there, I tell ya.
I have yet to find a vase for my little flowers, so they're sitting on my bookshelf at present. I'm hoping I'll find a real nifty one at a yard sale or something.
Enjoy! Let me know if you have any questions or if you decide to try it out.
Friday, August 19, 2011
Picture Wheel
Recently I've been working on a little project and I took pictures along the way so I could share it with you all. :)
A while ago, one of my mom's bike wheels got bent up. Long story short, she has to buy a new one and the old, bent up one can't be fixed. So I asked if I could have it.

Now you may be wondering what in the world I'd want with a bent up, old bike wheel. Well, I'd be more than happy to show you!
Ok...here's my subject for experiment. ;)
Tehehe!
I washed it with the hose real good first, just to get all the dirt and dust off.
Then I went out and bought some spray paint. Green to match my room.
{Side note: If you happen to do this yourself, and you're under the age of 18, you may need to take your mom or dad with you to get spray paint. At least I did. :)}
I found this paint in my basement. We actually used it to paint the baseboards in my bedroom last year. The white part of my wheel had a lot of skid marks on it that I couldn't get off so I decided to paint over it.
It's a good idea to use a drop cloth...
...and painter's tape.
{Another side note: My handy dandy brother, Zach, got the tire off of the wheel for me and it was a lot easier to paint that way!}
Tada! My finished product! My dad and brother helped me mount the wheel to my bedroom wall. Then I got a bunch (between 10 and 12) of my photos printed and paper clipped them to the spokes.
I really like how it turned it!
So, that's my newest addition to my room. Have you been working on any projects or crafts lately?
A while ago, one of my mom's bike wheels got bent up. Long story short, she has to buy a new one and the old, bent up one can't be fixed. So I asked if I could have it.
Now you may be wondering what in the world I'd want with a bent up, old bike wheel. Well, I'd be more than happy to show you!
Ok...here's my subject for experiment. ;)
Tehehe!
I washed it with the hose real good first, just to get all the dirt and dust off.
Then I went out and bought some spray paint. Green to match my room.
{Side note: If you happen to do this yourself, and you're under the age of 18, you may need to take your mom or dad with you to get spray paint. At least I did. :)}
I found this paint in my basement. We actually used it to paint the baseboards in my bedroom last year. The white part of my wheel had a lot of skid marks on it that I couldn't get off so I decided to paint over it.
It's a good idea to use a drop cloth...
...and painter's tape.
{Another side note: My handy dandy brother, Zach, got the tire off of the wheel for me and it was a lot easier to paint that way!}
Tada! My finished product! My dad and brother helped me mount the wheel to my bedroom wall. Then I got a bunch (between 10 and 12) of my photos printed and paper clipped them to the spokes.
I really like how it turned it!
So, that's my newest addition to my room. Have you been working on any projects or crafts lately?
Tuesday, December 21, 2010
Christmas Garland
I know, it's like five days 'til Christmas and I should have posted this like weeks ago. Ha! But better late than never, right? ;)
This is a craft that is super easy! We've been doing it for years and have garlands for just about every holiday. So, I thought I would share it with all of you. :)
Here's what you need:
First you need to get some rope. About this size:
Or you could go a little thicker:
Then you need to cut it off. Make sure it's big enough to go across a door frame or around a tree. Then take a small piece of tape and wrap it around the end so the rope doesn't ravel. Like so...
Then pick out some nice fabric. I chose this red plaid...thought it was Christmasy. :)
(Oook...my carpet decided to change colors in this picture...lol.)
Now it's time to cut your fabric. You can go all sizes or lengths. I suggest ranging from about 1in. - 1cm. in width and about 6in. long.
I use a grocery bag to keep all my supplies in...that way it's portable and not messy.
Now you just tie the strips of fabric to your rope. Just one knot (not a double knot) will do the trick. :)
Also, I suggest putting something in between you and the fabric when you're cutting it and when you tie it on the rope because you'll get 'little threads' (lol) all over your clothing. Trust me, I know from first hand experience. ;) So, maybe a blanket or a table top.
Then, when you're done, you can hang it on your door frame or wrap it around a tree. I twisted one around my bed frame one time. :) And, like I said before, we have garlands for almost every holiday. All you need to do is pick out different fabric.
I hope you enjoyed the holiday craft. :)
This is a craft that is super easy! We've been doing it for years and have garlands for just about every holiday. So, I thought I would share it with all of you. :)
Here's what you need:
- scissors
- rope
- tape
- fabric
- grocery bag (optional)
First you need to get some rope. About this size:
Or you could go a little thicker:
Then you need to cut it off. Make sure it's big enough to go across a door frame or around a tree. Then take a small piece of tape and wrap it around the end so the rope doesn't ravel. Like so...
Then pick out some nice fabric. I chose this red plaid...thought it was Christmasy. :)
(Oook...my carpet decided to change colors in this picture...lol.)
Now it's time to cut your fabric. You can go all sizes or lengths. I suggest ranging from about 1in. - 1cm. in width and about 6in. long.
I use a grocery bag to keep all my supplies in...that way it's portable and not messy.
Now you just tie the strips of fabric to your rope. Just one knot (not a double knot) will do the trick. :)
Also, I suggest putting something in between you and the fabric when you're cutting it and when you tie it on the rope because you'll get 'little threads' (lol) all over your clothing. Trust me, I know from first hand experience. ;) So, maybe a blanket or a table top.
Once you get more than one strip of fabric on the rope you'll have to start pushing them together to make it look full and thick.
Then, when you're done, you can hang it on your door frame or wrap it around a tree. I twisted one around my bed frame one time. :) And, like I said before, we have garlands for almost every holiday. All you need to do is pick out different fabric.
I hope you enjoyed the holiday craft. :)
Wednesday, October 6, 2010
Katie's Money Management
A while back I realized that keeping all my money in my wallet just wasn't working very well. It's way too easy to spend it! (For me anyway...lol) So...I thought up a solution! And thought I'd share it with you all. :)
This is now my new savings envelope. I thought I'd decorate it and make it a little more fun to save money. ;)
Because I have a bit of a hard time keeping my money out of a store's cash register and in my savings I thought I'd better write myself a little note...
Better make it two. ;) 
I want to save up to one day sponsor a child through World Vision (http://http//www.worldvision.org/#/home/main/help-change-a-childs-life-today-1-1119) so that is what this envelope is for.
So...my plan is to take a little out of my pay check every month and put it in my envelopes. And, hopefully, I'll be able to save up some money for something down the road. :)I want to save up to one day sponsor a child through World Vision (http://http//www.worldvision.org/#/home/main/help-change-a-childs-life-today-1-1119) so that is what this envelope is for.
Thursday, September 2, 2010
Less than 10 Dollars
What can you get for less than ten bucks? Well, this year for me, it was school supplies. Are you wondering how? I'll show you. :)
I found these folders with Bible verses on them in a two-pack for $2.50 at Walmart. Love them!
I bought the white binder for $1.78 and then used things I already had, such as the ribbon, stickers, and colored card stock, to decorate it the way I wanted.
$0.25 notebooks! Oh yeah!
This backpack was free, courtesy of a friend. (I haven't had to use a backpack since 4th grade...what a weird feeling!) You may be saying, "I can't go around asking my friends for a backpack, Katie." Check out your local consignment shops or Goodwill store. You can find barely used name brands pretty easy sometimes for great prices.
I hope everyone has a great school year!
Subscribe to:
Posts (Atom)